
Showing posts with label recipe. Show all posts
Showing posts with label recipe. Show all posts
Sunday, May 19, 2013
Lettuce Have Breakfast
Picked the first lettuce leaves of the season today. They really shot up after all the rain we had this week. I don't have a pic of the garden because it is raining, but here's the maple sausage biscuit & jack cheeze sandwich my husband just ate with fresh buttercrunch. Yum!


Thursday, January 5, 2012
I'm Not Dead Yet!
Happy New Year everyone! It was a wonderful holiday season for the grow peace family. I hope you enjoyed yours too.
Winter has been especially mild so far, especially compared to the last two years. So we were able to enjoy a salad on Christmas day with fresh cut arugula from the garden! It was very simple, just the arugula, red onions, oranges, almonds and a vinagrette made mainly with fresh squeezed orange juice and mustard.


Winter has been especially mild so far, especially compared to the last two years. So we were able to enjoy a salad on Christmas day with fresh cut arugula from the garden! It was very simple, just the arugula, red onions, oranges, almonds and a vinagrette made mainly with fresh squeezed orange juice and mustard.


We also had vegan 'goat cheeze' crostini, with fig balsamic jam, topped with fresh garden sage. It wasn't just a pretty garnish - it really did taste better with the sage. Our roasted potato side dish was flavored with fresh rosemary from the garden. Easy yet delicious.
I was really happy we were able to have a few treats from the garden for our holiday feast. It just makes things so much more special when you're grown them yourself!
Tuesday, May 10, 2011
Cilantro City
Check out my herb garden - it is growing wild!
 It isn't the greatest picture since it was late in the day, but that may be for the best since I need to get out there and trim them. I'm not really complaining though -nothing not to like about an abundance of herbs! I am going to try to use as many as possible over the next few weeks, before they get attacked by summer bugs. (I wish I could get them all in the dehydrator, or frozen, but I know I won't have enough time to pick and clean that many leaves).
The cilantro is so tall it looks like a city. Of course that means they're already starting to bolt, but I don't mind. Letting them go to seed last year is how I got this whole crop! I think the frilly tops taste just as good as the larger leaves at the bottom anyway.
 Tonight I harvested some cilantro, mint and chives to attempt to replicate a Peruvian quinoa taboule we had at a restaurant called El Tule in Lambertville over the weekend. (the mint is in another corner of the yard by the ferns, also growing like wildfire) Mine was low fat, and theirs was better, but it turned out pretty well for a first try. Very refreshing, and thankfully cooling since I served it with very spicy chipotle field roast sausages. (we did have avocado too, it just isn't pictured) Keep scrolling for the recipe.


The cilantro is so tall it looks like a city. Of course that means they're already starting to bolt, but I don't mind. Letting them go to seed last year is how I got this whole crop! I think the frilly tops taste just as good as the larger leaves at the bottom anyway.


Spring Herb Quinoa Salad
2 cups cooked quinoa
2 tsp olive oil
scant 1/2 cup each chopped cilantro, mint & chives
juice of 1 lime (or to taste)
salt & pepper
avocado slices (optional)
Mix all ingredients except avocado. Mound on plate and place avocado slices on top.
Wednesday, April 20, 2011
First Harvest of 2011
Today I picked a bunch of mache that self-seeded when I let a few plants go to seed last spring. Here they all are in the bed:
 And close up:
 Unfortunately I think they've already started to bolt. You can see the middle leaves are starting to get taller - that's going to shoot up into a seed stalk pretty soon. They were probably at their peak in March, but I missed it. So, I picked a bunch today and made a salad with mandarin oranges, walnuts and raspberry vinaigrette.
 This was the first time I ever ate mache, even though I grew it last year. (I totally missed the harvest window then since I had no idea they'd go to seed so quickly) It was delicious! The taste was very light and delicate. I can see why this green is also called lamb's lettuce - it evoked softness and spring.
I picked some chard and arugula that self-seeded too, and sauteed them with garlic and lemon. We had that as a side to whole wheat angel hair with white bean sauce. I'm not going to post pics of those, since that's pretty basic and look just like the chard & arugula I've posted here before. But it sure was nice to have fresh greens with no gardening work on my part at all!


I picked some chard and arugula that self-seeded too, and sauteed them with garlic and lemon. We had that as a side to whole wheat angel hair with white bean sauce. I'm not going to post pics of those, since that's pretty basic and look just like the chard & arugula I've posted here before. But it sure was nice to have fresh greens with no gardening work on my part at all!
Saturday, February 6, 2010
Wishing it was Summer: Nasturtium Goodies
Here's a few pictures of dishes I made with the nasturtiums I grew in 2009. First are flowers stuffed with almond pepper chreeze - these were so good!! I stuffed and rolled the leaves like dolmas too, and it was awesome. I used this recipe with some diced Italian frying peppers and ground black pepper to add a little heat.
I also made nasturtium and potato soup using the leaves. The soup was quite tasty - it was something like a vichyssoise soup, but with spicy greens. I would definitely make it again - except next time I would wait until the very end to add the milk. On the side I had a tea sandwich with a little Nayonnaise, cucumbers, more italian frying peppers (since I had so many to use up they made their way into everything!) and lemon pepper.
 Finally, I made two logs of nasturtium lemon butter and froze them. I didn't end up eating it until Thanksgiving, and still have the other in the freezer. (now that I think of it, I really should get it out!) In this picture you can see the butter on some toast. The flowers sprinkled on the plate are actually edible lemon gem marigolds, since that's all I had left at the time. Floral, yet spicy and lemony - it is hard to describe this butter but I really enjoyed it. It got raves from the relatives at Thanksgiving.
 My only regret is that I didn't start eating the nasturtiums until the end of last season. They were too pretty! But now that I know how delicious they are, I definitely will make more with them next summer.
First are flowers stuffed with almond pepper chreeze - these were so good!! I stuffed and rolled the leaves like dolmas too, and it was awesome. I used this recipe with some diced Italian frying peppers and ground black pepper to add a little heat.I also made nasturtium and potato soup using the leaves. The soup was quite tasty - it was something like a vichyssoise soup, but with spicy greens. I would definitely make it again - except next time I would wait until the very end to add the milk. On the side I had a tea sandwich with a little Nayonnaise, cucumbers, more italian frying peppers (since I had so many to use up they made their way into everything!) and lemon pepper.
Finally, I made two logs of nasturtium lemon butter and froze them. I didn't end up eating it until Thanksgiving, and still have the other in the freezer. (now that I think of it, I really should get it out!) In this picture you can see the butter on some toast. The flowers sprinkled on the plate are actually edible lemon gem marigolds, since that's all I had left at the time. Floral, yet spicy and lemony - it is hard to describe this butter but I really enjoyed it. It got raves from the relatives at Thanksgiving.My only regret is that I didn't start eating the nasturtiums until the end of last season. They were too pretty! But now that I know how delicious they are, I definitely will make more with them next summer.
Monday, January 18, 2010
Not a Fail Afterall. Hooray!
 It turns out the carrots and turnips weren't dead afterall! It warmed up and hit 50 this Saturday, so I went outside to see if the carrots were still edible. To my surprise, the green tops had perked back up and looked alive! They were still damaged, but nowhere nearly as bad as the greens in the other bed (which are definitely still dead, or at least dormant).
 The next test was taste, and the carrots passed with flying colors! Sweet and cruchy, they tasted just as good as they did in the summer. So I picked 90% of them. I figured I might as well eat them when I knew the eating was good, before it snows again. I left in just a few as a test, to see how long they'll last.
The turnips were also alive, but the ones I picked seemed a tiny bit soft. I am still going to try cooking them to see how they taste, but I haven't gotten around to it yet.
I lightly steamed the carrots along with some green beans, then finished them off in a saute pan with a bit of vegan butter, toasted fennel seeds and garlic. They were delicious! It was my first time using fennel seeds like that. I would definitely make this dish again (it was based off this recipe).
I had two friends over for dinner last night so I served them along with chickpea cutlets parmigiana (with Teese mozarella), homemade teese & unpepperoni stromboli, and saffron risotto from Nonna's Italian Kitchen.
 We also had an endive and apple salad as a first course. Next year my goal is to grow endives so we can have them fresh in the winter. In any case, my friends were happy they trekked on NJ transit all the way from the LES. :-)
Wednesday, December 9, 2009
Green Tomato Canning 2009
 This year we made Farmgirl Susan's Green Tomato Relish (front) again, as well as a new recipe for Green Tomato Salsa (back). Once again, I got overwhelmed with all the chopping and my sweet husband ended up doing most of it for me.
We used this recipe I found on the Gardenweb forums for the salsa, except I changed it to be 6 cups green tomatoes and 3 cups onions, (instead of 5 & 4) because that seemed to be a lot of onions for my taste. I checked the Blue Book, which said the tomatoes are more acidic than onions, so I figured it was a safe substitution. We only got 4 pints out of it instead of 5 like it says. This is the full recipe:
Green Salsa
Yield: 5 pints
6 cups chopped green tomatoes
1 1/2 cups seeded, chopped long green chiles
1/2 cup seeded finely chopped jalapeños
3 cups chopped onions
1 cup bottled lemon juice
6 cloves garlic, finely chopped
1 Tbsp ground cumin*
3 Tbsp oregano leaves *
1 Tbsp salt
1 tsp black pepper
Combine all ingredients in a large saucepan and stir frequently over high heat until mixture begins to boil, then reduce heat and simmer for 20 minutes, stirring occasionally. Ladle hot salsa into pint jars, leaving 1/2-inch headspace. Adjust lids and process in a boiling water canner 15 minutes at 0-1,000 feet altitude; 20 minutes at 1,001-6,000 feet; 25 minutes above 6,000 feet.
The relish was once again delicious, and the salsa wasn't bad either! It was definitely tart, which might not be to everyone's liking. However I really like tart things, and so does my partner, so we both thought it was very tasty.

I had it on burritos with spanish rice, roasted frozen bell peppers from the garden, onions & potatoes with oregano & cumin, and Soyrizo. The peppers, onions & potatoes came out so tender and tasty!
The only thing I did different this time was roasting them on 425 instead of 375 or 400. The higher temp was just right. I think it took about 40 minutes - stirred once in the middle.
Here's the whole burrito. It was so big I could hardly fold it into a wrap. I had to eat it with a fork and knife. Mmm just looking at it is making my mouth water. I love Mexican food!

The only thing I did different this time was roasting them on 425 instead of 375 or 400. The higher temp was just right. I think it took about 40 minutes - stirred once in the middle.
Here's the whole burrito. It was so big I could hardly fold it into a wrap. I had to eat it with a fork and knife. Mmm just looking at it is making my mouth water. I love Mexican food!
Saturday, December 5, 2009
More Autumn Garden Leftovers
 Remember these Acorn Squash? They were an accident in my garden this summer, since I thought I bought yellow summer squash but apparently it was labeled incorrectly. Eventually, I realized, hey! these are acorn squash!
The plant grew HUGE! It was way too much for my small garden, as you can see above. Then, to top it all off, evil Squash Vine Borers decimated the plant in August.
 The good news is, as you can see from the picture on the left, the squash were mostly ripe. I picked around a dozen of these.
Two or three of them had those weird scratch marks on them, so I didn't eat those. But the rest had at least a good patch of yellow, so I figured they were ripe enough to save.
Of course, in the middle of summer, I had no idea what to do with them - 90 degrees with high humidity is not exactly roasted veggie soup time.
So instead of eating them then, I gave a few away and roasted the rest, then froze them.

I finally made soup with it the day after Thanksgiving. It was super easy - I just poured the frozen pieces of roasted squash into a pot with the leftover Imagine No-Chicken broth that we used for the stuffing the day before. Then I added some fresh rosemary, thyme and red hot pepper flakes. S & P to taste, pureed with an immersion blender and voila! delicious creamy soup. It really was tasty!
A few days later I added nutritional yeast to the leftover soup and poured it over whole wheat spaghetti mixed with spaghetti squash as a kind of cheesy-ish sauce. I didn't take a picture of that one, b/c I'll admit, it wasn't very beautiful. But sometimes, ugly things taste great! My partner wouldn't touch it b/c he doesn't like squash, but to me, it was delicious! I love squash, any and all kinds.
I still have about 2/3 of a bag left in the freezer, so I'll definitely be making this soup again in the cold winter months.
Thursday, December 3, 2009
Thanksgiving Garden Eats Part 2
Here are the promised pictures of the food I made for Thanksgiving with garden produce.
Turnip Mashed Potatoes with Turnip Greens: Baby Carrots Roasted with Brussels Sprouts, Rosemary, Thyme, Shallots & Garlic: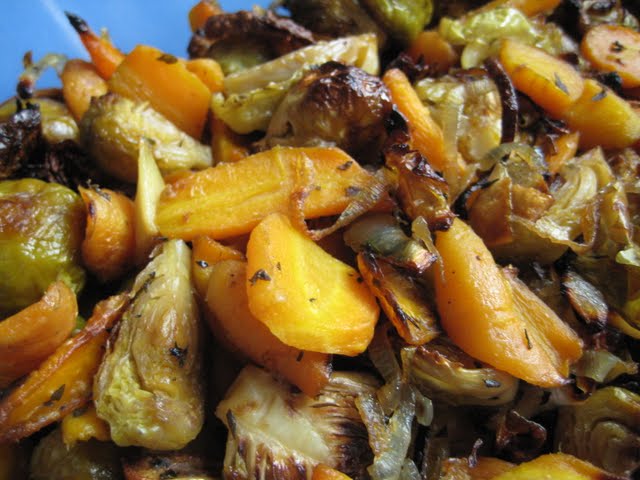
Unfortunately, I didn't get a picture of the Arugula Salad with Pomegranates & Pecans, b/c my camera battery ran out and I forgot to bring a spare to my mom's. So instead here is the recipe.Baby Carrots Roasted with Brussels Sprouts, Rosemary, Thyme, Shallots & Garlic:And here is a picture of the whole dish, actually leftovers a few days later since I had no battery. But both my husband and I thought it was even better the second time! Oh how I love Thanksgiving food!
Clockwise from the top: Turnip Mashed Potatoes, Roasted Veggies (including roasted cauliflower not mentioned above), homemade Maple Cranberry Sauce, Green Bean Casserole, Celebration Roast and Herb Stuffing in the middle, all smothered in a Marsala Brown Gravy.
Saturday, November 21, 2009
Green and Yellow Bells + Italian Frying Peppers
 I've had this post half done for weeks, and just not gotten around to finishing it. I've also got several more on backlog about hot peppers and dehydrating, plus a couple of other topics. The good news is, there is plenty to keep this blog going through the winter months. Then, before we know it, it will be time to start buying seeds and growing them indoors next winter!
So, today let's finally take a look at this season for sweet peppers like Bells & Italian Fryers.
It was actually a pretty terrible year for peppers. Without a doubt, my Italian frying peppers and hot peppers did better last year. The bell peppers didn't do so hot last year either, b/c I'm pretty sure there is something lacking in my soil that they need. But, that said, despite the cold and rainy weather in the beginning of the summer, and bouts with blossom end rot (or something), I still got to eat some sweet peppers.
I bought three flats full from the nursery, which only came in packs of 6 so I had 6 green bells, 6 yellow bells, and 6 Italian Frying peppers. They barely fit in the garden. What you see on the above left is two rows of the Italian Fryers immediately behind the basil on the left side of my garden, and then a row that was half green and yellow bell behind it.

Here on the right is a close up of the Italian Fryers on Oct. 4th, which are tiny. The big difference from last year was that I kept picking all through August and Sept last year, but this year not so much. I wasn't really able to pick them until right before frost, since they weren't exactly ripe.
Then, on the other side of the garden I had the rest of the green and yellow bells (along with all the hots). Here they are on August 1st, still pretty small:


The biggest problem was with the Yellow Bells. The green ones were fine, but until early October I couldn't get a yellow bell to ripen without a blemish. You can see the problem below. On the left is the yellow color the peppers should be, but it has those weird brown spots. On the right is the unripe version of the yellow bell, which looks fine. I had to compost so many b/c of brown spots that I ended up just eating them while they were still light green. Which wasn't that bad - they still tasted fine. I just really need to get a soil test to figure out why this is happening.

You can see here finally, on Oct. 10th, a yellow bell actually ripened fully without a single brown spot! WUHOO!
And really, who uses that many bell peppers anyway, right? They're usually either roasted or diced up in the trinity, not really a stand alone ingredient. Even with a crappy harvest I had to slice and freeze a whole large baggie full of peppers. I also used them in sauces, and salsa.
Then I even got to make my absolute favorite green pepper recipe, which is another one of these recipes that is so simple yet so good. It is just:
2 tsp olive oil
2 cloves garlic, minced
1 green pepper, minced
1 bay leaf
2 cups cooked black beans
1 tsp dried sage (or 3 tsp fresh)
hot sauce, to taste
All you do is put a bit of olive oil in a pan, then saute the garlic, green peppers and bay leaf until the peppers have just begun to soften, about 4 minutes. Then add the beans, sage and hot pepper sauce and saute until heated through, about 3 minutes. Serve hot as an appetizer or side dish with garlic bread, corn tortillas or even corn bread. It is even good cold the next day!

 Finally, in the end, I still picked more peppers than I knew what to do with. The harvest before frost was overwhelming, as pictured here and here. I gave a huge bag to my neighbor, dehydrated some, stuffed some more, made a double batch of pepperonata from Nonna's Italian Kitchen - half we ate with polenta and the other half I froze- and still have two bags left in the fridge! Luckily, my Mom gave me some green bags, which do seem to work. I hope to roast them on the grill today, then freeze them. Phew! Here's two pictures of the dehydrated peppers, before and after:

Next year, I don't think I want 18 pepper plants! If this was how much they produced in a bad year, I'd be drowning in them in a good year! I think I might try buying seeds and starting them myself. That way I can have several different types of peppers, but only 2 plants of each type, not 6.
Tuesday, October 27, 2009
Another Squash Post?!?! You've Got to Be Kidding
 Nope, I'm not kidding. Here is squash post #5.
As you can see to the left, I had three more to deal with.
Unfortunately, I didn't have time to make anything with them until a week after picking and the big one got soft. Whoops.
But the other two were still good, so I don't feel too bad about letting one go into the compost, with everything I've used them for all summer.
They ended up in a Zucchini, Potato and Cilantro Soup. I found the recipe on epicurious.com, and figured it must be good since it is rated with a resounding 4 forks. But wow, it exceeded my expectations. I hate to hype it up, because then you'll try it and be like "meh", but I can't stop raving about it!! I really am not a huge fan of soup. However this was hands down one of the best I've ever eaten. It was perfectly balanced.
The only thing I had to change to make it vegan was use Earth Balance Buttery Spread instead of butter. I also only used 2 tbsp instead of 3, to make it slightly lower fat. But even without that, it is a low-cal recipe. Plus, it was super easy to make, and also used up some jalapenos from my garden. (Even cooler, if I had my dream half acre of land, it could be made almost entirely from home grown ingredients. *sigh* Someday.)
Here it is sauteing in the pot before adding the broth. Which, btw, was Imagine Organic Vegetable Broth that I got a whole carton for only 99 cents at Jack's in Manhattan! Gotta love Jack's. Wuhoo.
 And the final product (unfortunately the picture does not do it justice). No croutons were needed.
My partner doesn't even like squash and he ate his all up. It was so good I had two huge bowls! This is definitely my new #1 favorite soup. I look forward to making it in the winter with the squash I dehydrated a couple weeks ago.
I've only got 1 more squash left on the vines. I think they are pretty much done for the season, what with all of this cool weather we've had. (though, no frost yet) So I guess this will probably be the last squash post until next year. :-(
Saturday, October 24, 2009
Fordhook and Rainbow Swiss Chard
 This is a picture of my strawberry/swiss chard bed on Oct. 11th. The strawberries are in the middle, and the chard is in a row at either end. Right behind the fountain is a row of Fordhook Giant Swiss Chard, and in the back, a row of Five Color Silverbeet Rainbow Swiss Chard. Last year I grew the Rainbow, but it grew quite slowly and never got that big, although I did get a few harvests and it was tasty (plus pretty). So this year I decided to try the Fordhook Giant, which was recommended for my area by the local Master Gardener program.
 Well, it surely lived up to its name!! I couldn't believe the gianormous leaves I harvested from those plants. To the left is a close up with my hand on a leaf for size comparison.
I've gotten at least 3 or 4 nice size harvests off the plants so far, and there is plenty left. They're also biannual, so I'll probably be able to harvest them again next year.
I still have a few plants alive of the Rainbow from last year in another spot in the garden (now under the row covers). Unfortunately, they did get attacked a bit by leaf miners, pretty much chard's only pest. It is amazing how the critters manage to zoom in on their favorite plants so quickly, when just last year my yard was only weeds! At least so far, the leaf miners haven't touched the chard in the strawberry bed.

At first I was a bit worried that the chard would be bitter with the huge size of the leaves and dark green color, but to my pleasant surprise they were amazingly tender and delicious! You can see the last harvest I picked to the right, on the same day I cooked the Italian Brunch described in the last post. Most of it is the Fordhook, with just a bit of the Rainbow that's reddish-purple. It did also grow in yellow, white, and orange-y colors.
I often use chard in cooking in place of spinach. Personally, I like it even better - it tastes mild and delicious to me. I'll put it in tomato sauces, veggie sautes or even lasagna.
Most often though, I just saute some minced garlic in a bit of olive oil, (and sometimes red pepper flakes) then throw the roughly chopped chard in until it just wilts. Then I squeeze on a generous amount of fresh lemon juice, and maybe a bit of salt and cracked pepper. Simple yet outstanding as a side dish. That's how we ate it that day at brunch. Here's a picture:

Wednesday, October 21, 2009
Basil Pesto and NYC Style Pasta Brunch
 I had this whole epic post about sweet peppers 3/4ths written, and then discovered that the central recipe for the post has disappeared. I have no idea where it is, and it is one of my favorite recipes. Boo!
In the meantime I'll just have to post this quickie leftover from a September Sunday brunch. Which isn't so bad, since this New York style brunch (i.e., it happened in late afternoon) was super delicious.
As you can see above, it was a simple pasta dish. I made the sauce with diced tomatoes and peppers from the garden (bell, italian green fryers and jalapenos), plus shredded carrots, onions and garlic from the store. I slow sauteed these things with my usual herb combination - thyme, oregano, marjoram and bay leaf, then served it over angel hair pasta.
I'd usually put some basil in there too, except this time I made a basil pesto to go with it. That's the dollop on top. It is sort of a funny color since I used purple basil, but wow was this purple basil delicious. I'm not really sure what type it is, since I bought a mixed pack of assorted basil. It was very floral. Even though it had bolted and grown flower heads by that point, it didn't taste bitter at all - just the most wonderful flavor.
Below is the best picture I can find of this mixed basil patch. You can kind of see it behind the Calendula flower bed. From left to right it is green, purple, green, purple. I had no idea what they would end up like when I planted them, or else I would have done it differently. It was basically like a basil grab bag. I think there was definitely some kind of lemon basil in there, which I really didn't like - it tasted medicinal. Also, some kind of really short basil with beautiful flowers. I think there was at least two plants of good old green Genovese - that and the purple (maybe Opal?) definitely tasted the best. Next year I think I'll definitely grow those two.
 Below is a picture of the leaves before I pureed them, with a bit of olive oil (not a lot, b/c of the diet again), nutritional yeast, walnuts and garlic. I probably put salt and pepper in there too - I didn't use a recipe, just whizzed it all in the food processor. It's hard to go wrong with these ingredients inmho.
 Then I also had the italian pepper almond chreeze discussed in a previous post dolloped on top, and on a whole wheat english muffin. See, it involved an English muffin - thus making it brunch. haha
I wish I could have more leisurely sunny Sundays spent in the garden like that September day...
Saturday, October 17, 2009
Nuts about Nasturium
 I just absolutely adore these flowers!! They grew so beautifully this year, it went far beyond my expectations.
My garden is edged with a gorgeous array of spicy edible plants. It makes me smile every time I go outside to see these bright and sunny flowers.
Even on rainy days, they are so brilliant amongst the green they practically glow. None of the pictures I've taken capture this effect as intense as it is in person.
Who needs skittles when you've got Nasturtiums? They're a real rainbow of flavors.


Aside from just tossing the blooms in a regular salad, this Apple and Sprout salad looks great (and could use some of the season's best fruit if it stops raining long enough to go to the nearest u-pick or farmers market).

This looks like a decent recipe for stuffed flowers, but probably instead of tofutti I'd use my homemade almond chreese. Another recipe for blackberry stuffed flowers features maple sweetened tofutti. I can't quite imagine a sweet stuffed blossom tasting that great, since they are quite peppery. But maybe next year when my blackberry bush is ripe I'll try it out anyway.
Nasturtium & Grape salad seems like a good basic salad but with a yummy twist (the grapes). Here is an even simpler fruit salad featuring strawberries. I should have made this green bean and tarragon salad before my haricot verts gave up the ghost, since it would use them and some of the huge tarragon plant I've got but never know what to do with. Well, there's always next year.
Of course there is the ubiquitous nasturtium vinegar idea - that recipe looks better than most I've seen around the web. I'm not going to bother with a pickled nasturtium seed recipe, since there are so many on the web and I don't plan on doing it this year I don't think.
Then there's nasturtium lemon butter, or a jalapeno nasturtium aioli that sounds amazing! I'd have to try one of these vegan replacements for the egg, such as jarred mayo or cashews, tofu or maybe white beans.
I really like this idea, "for a tangy alternative to chives, chop nasturtium leaves finely, and sprinkle them over a jacket potato. " Sounds easy and baked potatoes are a freqent favorite in my house, so this is definitely one to try.
I definitely need recipes for the leaves since there are soo many about to succumb to frost. This pesto looks interesting. Here's another idea: nasturium leaves wrapped around sundried tomato, flowers & basil almond chreese stuffing, tied with a chive.
Here's a recipe for Nasturtium potato soup that would use up a lot of leaves, although I have to say it doesn't look like it would be very tasty from the list of ingredients. Although this soup recipe from epicurious also seems rather plain - perhaps the nasturtiums add so much spicy flavor you don't need much else. This carrot and nasturtium soup looks a little more interesting, though I'd probably be too lazy to do carrots four ways for it. I guess the only thing left to do is try them and find out.

Of course my list of recipes wouldn't be complete without some nasturtium tea sandwiches. This one with cucmbers looks delicious.
Wow, there's even a recipe for nasturtium bitters! And a hair conditioner that uses dried flowers. Doubt I'll be that adventurous this year, but maybe some day...
Ok, now that I've officially gone nuts and compiled enough nasturtium recipes to last a lifetime, we'll just have to see what comes out of the kitchen over the next week.

Subscribe to:
Posts (Atom)
