Showing posts with label tomato. Show all posts

Wednesday, April 13, 2011

Growing Seedlings

I'm so happy my seedlings are doing better this year, especially since it is my first attempt at growing tomatoes from seed. Here's some quick picks of my green babies:

the whole setup
mountain magic tomatoes
red romaine (front) & swiss chard (back)


gem marigolds, green romaine & ground cherries (l to r)
gem marigold close up
teeny ground cherries (back & right)

Sunday, May 16, 2010

Tomato, Pepper & Basil Nursery Order

So here are the pictures of my long-awaited Cross Country Nursery order. I picked them up on Sunday May 9th, but it was too cold to plant them so I had to wait. These pictures were taken a week later right before planting on May 15th. I have to admit I'm a bit disappointed, especially in the tomatoes.
This is the Ramapo, Snowstorm and Matina tomatoes. Granted, the bottom leaves are a bit more yellow than they were on the day I brought them home, but they still looked pretty leggy to me right when I got them. It is definitely not what I expected. I actually showed the Ramapo to the woman working at the nursery, and she told me "we like our tomatoes tall, afterall they are big plants" and that the short, leafy ones you see in other stores are sprayed with growth retardant.

I was as nice as could be about it, b/c I didn't want to cause a stink, but I did say I didn't think that's what they look like when you grow them at home. So then she admitted, "Well, we do grow hundreds of them together in flats so there really is no where for them to grow but up" and told me to pull off the bottom leaves and plant them about 6" deep, so that's what I did. She also assured me, "we're so well known for our tomatoes, really it is not a big deal". I hope that's true! I'm actually not that concerned, because I do think they will grow good roots that way and come back as strong plants. But still, for the price I paid I was just hoping for something a little less leggy!
Here's the Sungold, Grape & Black Cherry. The Black Cherry looks the best - I'm happy with that one, and the Grape is pretty decent too. The Sungold not so much though. I planted that one deep.
I was much happier with the peppers. I guess that's their real specialty though, so it makes sense. Lots of them had blooms and even tiny peppers on them already. As much as I hated to do it, I pinched them all off so the transplants could concentrate on growing roots. Above you see the Orange Sun, Ariane, Bell Boy and Lady Bell peppers.
This is 2 Marconi Golden, 2 Cubanelle & the Nardello.
The Little Dickens and Yummy Orange minis.
The hots: Pepperoncini, Ancho Mulato, Thai Hot Dragon and Jalapeno Tam.
Finally, here are the basils. 2 Genovese, Magic Michael, Summerlong, Osmin Purple & Red Rubin. I was happy overall with these, except the purples do look kind of leggy too. After planting I snipped the tops off of them to encourage more bushy growth. Also, ironically, I picked the Summerlong because I read online it is supposed to be a special variety that takes extra long to go to seed. Well, it is the only one that was already full of flowers! So much for that one.

Wednesday, October 21, 2009

Basil Pesto and NYC Style Pasta Brunch

I had this whole epic post about sweet peppers 3/4ths written, and then discovered that the central recipe for the post has disappeared. I have no idea where it is, and it is one of my favorite recipes. Boo!

In the meantime I'll just have to post this quickie leftover from a September Sunday brunch. Which isn't so bad, since this New York style brunch (i.e., it happened in late afternoon) was super delicious.

As you can see above, it was a simple pasta dish. I made the sauce with diced tomatoes and peppers from the garden (bell, italian green fryers and jalapenos), plus shredded carrots, onions and garlic from the store. I slow sauteed these things with my usual herb combination - thyme, oregano, marjoram and bay leaf, then served it over angel hair pasta.

I'd usually put some basil in there too, except this time I made a basil pesto to go with it. That's the dollop on top. It is sort of a funny color since I used purple basil, but wow was this purple basil delicious. I'm not really sure what type it is, since I bought a mixed pack of assorted basil. It was very floral. Even though it had bolted and grown flower heads by that point, it didn't taste bitter at all - just the most wonderful flavor.

Below is the best picture I can find of this mixed basil patch. You can kind of see it behind the Calendula flower bed. From left to right it is green, purple, green, purple. I had no idea what they would end up like when I planted them, or else I would have done it differently. It was basically like a basil grab bag. I think there was definitely some kind of lemon basil in there, which I really didn't like - it tasted medicinal. Also, some kind of really short basil with beautiful flowers. I think there was at least two plants of good old green Genovese - that and the purple (maybe Opal?) definitely tasted the best. Next year I think I'll definitely grow those two.
Below is a picture of the leaves before I pureed them, with a bit of olive oil (not a lot, b/c of the diet again), nutritional yeast, walnuts and garlic. I probably put salt and pepper in there too - I didn't use a recipe, just whizzed it all in the food processor. It's hard to go wrong with these ingredients inmho.Then I also had the italian pepper almond chreeze discussed in a previous post dolloped on top, and on a whole wheat english muffin. See, it involved an English muffin - thus making it brunch. haha

I wish I could have more leisurely sunny Sundays spent in the garden like that September day...

Saturday, October 10, 2009

Tomatoes in October

So there the tomatoes are, on October 3rd - in all of the garden's late fall glory. I just love how the climbing nasturtiums are growing up amongst them.

I'm also glad the tomato cages we built worked well. Sometimes it was a bit hard to fit my hand or the bigger tomatoes through the smaller holes, but not too bad. As you can see they haven't rusted at all so I think we'll get many more seasons out of them. Over the winter I think I'll cut some more big squares to fit my hand through, and use a dremel to file the sharp edges - since I did get a few scratches from the cut wire edges this season.
Above is little bit more close up - I know it doesn't look like much more than a huge tangle in these pictures! You also don't see many ripe ones because I had picked them all just before taking the picture. I dehydrated those as an experiment in my new dehydrator, which you'll see the results on in one of the next posts.

You can also see the plants got kind of brown towards the bottom. That actually started happening over a month ago, so it isn't just normal late season browning. I think that was also caused by the terrible weather earlier this summer.
Mr. Aubade picked more all throughout the week, that we ate with tacos and in salads. And here is the harvest I got today - along with two more amazing squash!! Can you even believe these things?? I actually got out the measuring tape this time, they were a full 32 inches long!! I'll also post more about these later.

Now let's check out a close up of each individual plant, all taken last weekend on October 4th. First, the Roma:


Here's the grapes - yellow on the left and red on the right.


Finally, here is the Rutgers. Most of the green towards the top of the left picture is actually the red grape that grew over onto the Rutgers cage. It is really just the little curled up plant towards the bottom. And the big red ones on the right are what I picked today that are pictured above.

2009 Tomato Season History

OK, so here are the promised 2009 tomato pictures. Here they are in the new tomato cages we built on June 6th, a few weeks after I first planted them. In the front, on the left is a yellow grape variety, and a red grape on the right. In the back on the left is Roma, and Rutgers on the right.


The grape tomatoes finally started getting ripe on July 17th. I think these two were the 1st ones we picked this year. Ever since then, we've had a constant supply of grape tomatoes, around 1 - 3 bowls per week.


Below you can see the first four good Romas I harvested on July 30th, but there certainly wasn't a constant supply all season. Maybe a few batches of 8 or so each during August.

Unfortunately they appeared to have a mild case of blossom end rot. Many of them ended up a little rotted on one end, with black on the inside. So I'd say maybe as much as half of the Romas ended up in the compost. I figure it was probably caused by a combination of the poor weather and that my soil needs more compost/organic matter added to it. The good news is, as the season progressed it got better. I also think my compost pile will be ready by next spring, and I am going to mulch all the beds with straw over the winter. That should add a decent amount of nutrients to the soil as it breaks down.


Then on the above right, the first, and one of the only Rutgers we got this year, picked on July 25th. We picked a couple more in August, but hardly any at all, maybe a dozen.

This plant did terrible this year, which is so strange because the same variety did fantastic last year in a spot just a few feet behind where it is now. You can see on the left on August 29th, very small and not looking so good.

I'm sure at least part of it was from the terrible weather we had - I think it just got off to a very slow start and never really fully recuperated. I think it also may have been shaded a bit too much from the grape tomato in front of it. We actually picked our biggest haul from it that same day, pictured below. I guess I should just be happy it didn't die from this year's plague of blight!
Only now are we getting some from this plant - just picked 6 nice ripe red ones today. However, all that's left is maybe 5 green ones, so I don't think we'll get much more. I am going to make a separate post for the tomatoes today, since there are already so many pictures in this one.

You can see many of the things I made with all these tomatoes back in this older post.

Thursday, October 1, 2009

Even More Squash!!!

I can't even believe it myself, 3 squash posts in a row. And there are two more 3 footers growing on the vine, so there very well may be several more squash posts! But I'm definitely not complaining - I'm happy to have finally reached that 'so-much-squash-I-don't-know-what-to-do-with-it' point that so many gardeners talk about. Especially considering it didn't happen until late September/October, and these tromboncino's are so delicious. Above you see two that were harvested on Sep. 26th, along with the rest of the bounty I gathered from the garden that day.

Here are the latest two dishes I made with the squash. First up, the "crab" cakes that I mentioned in the last post. Sorry it is a pretty boring picture, with no parsley garnish or anything, because I'm working on two huge reports for work this week and had no time to do dinner. (Which also means tonight's 1st veganmofo post will be quick. I hope to finish these reports by Monday so next week will be better!) But, it did taste really good! I think the Old Bay seasonings were a bit light though. Next time I think I would add more.The squash that made these cakes was so big, it was enough to make another two batches of the zucchini bread from two posts ago. We already ate one loaf, and froze the other. But that left another small squash to deal with! So last night I made it into a sort of 'kitchen sink' veggie stew - my go to recipe for summer produce.

This time it had the squash plus lots of garden yellow grape tomatoes, green peppers and jalapenos since I needed to use those up, as well as what is probably (sadly) our last batch of the emerite haricot verts pictured above. There will be another post about those this October for sure - I think it may have been my favorite plant this year. Soooo delicious. I also added some herbs from the garden - thyme, fresh bay leaf, oregano and a bit of marjoram.

Plus from the store, some shredded broccoli slaw I had leftover (and since I had no broccoli tops, which I usually like to put into a stew like this), chick peas, carrots, onions, garlic, jarred tomato sauce and shiraz wine (which gave it the kinda purple color). Not my best stew yet, but certainly good. We both sort of looked at it like 'eh, meh' considering how much good food we've eaten lately. But then like 10 minutes later we looked at our plates and it was all gone! Om nom nom. Haha. Must have tasted pretty good! It is really hard to go wrong with this combo of ingredients.

I served it with shells and Joanne Stepaniak's mostarella chreeze, smoky variation. This chreeze takes a bit of getting used to - it definitely isn't quite like mozzarella. But it is so good in its own right, and contains no soy, plus protein from the oats and tahini. We love this chreeze. The following picture isn't that great, but hopefully you can see how it gets melty and creamy on the shells. It is one of our favorite recipes.

Sunday, June 7, 2009

Bird Netting/Greenhouse Rowcover, Tomato Cages & Trellises Done!

It looks like a spaceship back here, there are so many shiny metallic shapes all around!

We put more of the Ikea trellis from last year on the other side of the yard and built 4 huge tomato cages using these instructions: http://yourhomegardenblog.com/vegetable-gardening/constructing-tomato-cages-using-wire-mesh

Except for one difference: the wire mesh in both home depot and lowe's was super rusty and expensive. so instead we got some type of galvanized wire. I have to look up exactly what it was b/c my partner bought it but I can only make a short post of notes right now as I have other work to do. This wire is very shiny and not rusted at all.

The only problem is the holes were smaller so it would be hard to reach your hands in to harvest the fruit. So I took a pair of industrial wire cutters we just bought and made 15 extra big holes per cage. I may have to cut more, but I figured that was enough to start.

We staked them into the bed with 1 rebar each, and 2 wood stakes each. They do seem extra strong so I am very pleased.
Then, I finally made one of the rowcover mini greenhouses w/ the wire that I read about in Eliot's book last fall!!

It really worked!!! I am so happy.

I made 3 hoops with the wire then pushed them into the dirt about a foot, in the holes of the concrete blocks around my strawberry & pea bed.


The wire did not make perfect hoops like I wanted it to, b/c it was kind of flimsy. So the shape is really uneven. At 1st it didn't seem sturdy enough to hold up to wind so I also had to make a 4th hoop to go across all three, as a crosspiece for stabilty. Then it seemed really strong, so that was easy enough to fix.


I think it may of been especially flimsy b/c I had to make the hoops pretty high, like 3 ft tall. There is a short trellis with burpee early perfection peas growing in the middle of this bed, with 4 different types of strawberries.


Although I wasn't planning on growing peas in there again - I was just going to let the strawberry runners fill it in - I think the trellis may have ended up working in my favor b/c I attached the wire to it for extra stability. And it is a pretty strong trellis. I hammered it in more too, so it is really in there.


I actually had to finish it yesterday for bird netting, not agribon, so the birds and squirrels would not eat my berries. The bird netting I bought at home depot last year was only held over it w/ logs & stones, and the peas were getting tangled in it.


So I attached the bird netting to this hoophouse structure with plain old wooden clothespins. I figured the clothespins would make it very easy to just take one off, pull up that section to pick a berry, then just clip it back on.


That was yesterday, and today it still seems to be working great! I have to go pick some berries right now. yum :-)


I still have to build several more of these, and believe the next ones will be better.Of course there's a learning curve.


I even had an idea, since this one looked so much like a modern tent - why not use a type of good tent poles design to make ultralight moveable mini greenhouses? I may have even read it in Eliot's book...I think I heard that idea somewhere before. I really think something like that just might work.


Tuesday, November 18, 2008

The Garden that Keeps on Giving

I can't even believe it. We're expected to get snow tonight, and even though I picked everything I thought possible before the last frost almost a month ago, yesterday I still got an entire bowl full of veggies from the garden!

I picked this assortment of bell peppers to the left (green now, but hopefully will turn orange like they are supposed to after a little stay in a paper bag) and Italian green frying peppers on the right:
Then these habaneros. The ones towards the bottom, not in the tupperware- were picked just yesterday off of the plants left untouched outside in the garden. The really orange ones in the tupperware at the top of the pic were taken off of a plant we pulled out of the ground before the first frost mentioned a couple posts ago, and placed in a bucket full of water in the basement. At first they were green, but sure enough turned orange after about 2 weeks, and still look pretty decent as you can see. We need to make them into hot sauce or freeze them or something as soon as possible though. There were actually more of them that my crazy hot-loving husband has been eating all along as garnish on pretty much every meal (seriously- be puts them on his hash browns in the morning, and again on his pasta at night) . I still have yet to even touch them (and have no intention to do so!)

Finally, even more green grape tomatoes!!! This plant was like the little engine grape tomato that could. This whole bowlful was just picked yesterday on November 16th, and on top you can even see two red ones! Amazing to think that we've been harvesting red grape tomatoes from this same plant since early summer. Just Wow.

Sunday, November 9, 2008

Scary Belated Halloween Post


Boo! Its an army of ugly angry tomatoes coming to get us a little after Halloween! Scaaaary. Actually, these were some of the last red tomatoes I picked back on October 4th. But I'm posting them now because I just learned something new about ugly tomatoes- something called "catfacing" and "growth cracks". I think the tomatoes above are afflicted by growth cracks, though I had a couple with catfaces too. I just want to post the links I found here so I don't forget next summer.

http://www.organicgardening.com/featureprint/1,7759,s-2-28-1121,00.html
http://wihort.uwex.edu/fruitveggies/TomatoDisorders.htm

Here's something positive for this post: I still picked 6 italian frying peppers like the ones above from my garden tonight, Nov. 9th! Amazing. They were delicious in this soyrizo polenta bake with some garden fresh oregano and a garden cayenne: http://vegweb.com/index.php?topic=13183.0

Sunday, October 26, 2008

Green Tomato Preserves: TAH DAH!

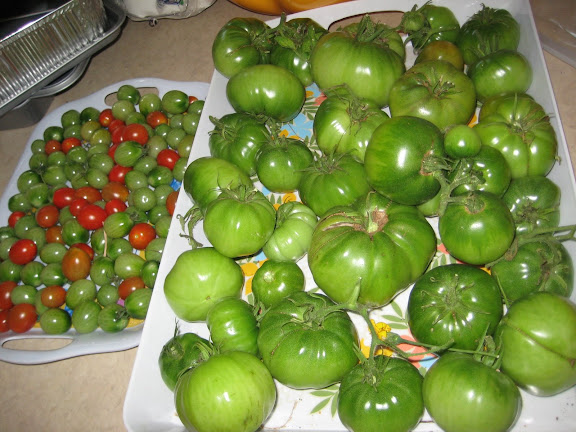
You might remember these tomatoes from the pre-frost harvest last weekend. There were actually at least twice as many green grape tomatoes but I didn't get all of them in a picture together.
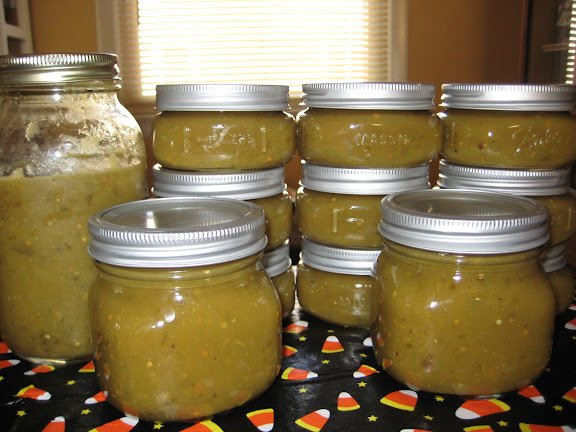
Well it took a few days, but my partner and I finally got it together and turned them all into preserves. This is the first time either of us had ever attempted real home canning. Athough my husband's father has, and hubz had watched him do it. So at least that was something.

We followed the Bell Blue Book as well as we could, but not as well as it said we should. I noticed on like every other page it admonished the reader to follow the recipes exactly and use absolutely no substitutions. We couldn't really do that though, as we don't have a scale. So we had to approximate measures as best we could. That was the toughest part. The other thing it said was to use the fruits and veggies immediately after picking them, which we didn't manage either. I'm hoping we did ok though, and won't get botulism. It seems to me as long as their is plenty of vinegar and lemon in there, and they were boiled long enough, we're probably ok. I hope.

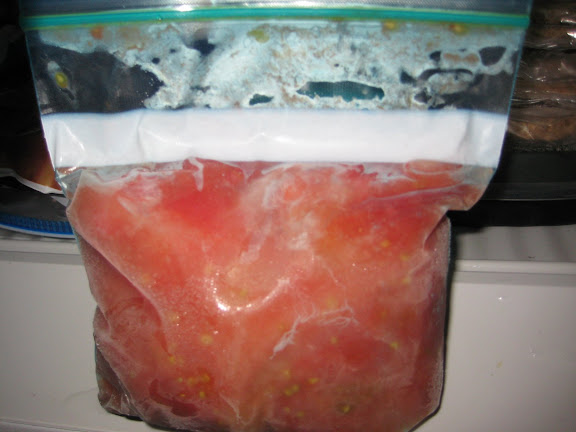
The first thing we did was separate out the red tomatoes, and place them in boiling water for 30 - 60 seconds. Let them cool, then proceeded to peel, chop and deseed. Finally they were placed in a Ziploc freezer bag, and as much air was squeezed out as possible. Here they are after freezing for two days, looks pretty good. I think they'll make a good sauce in November.
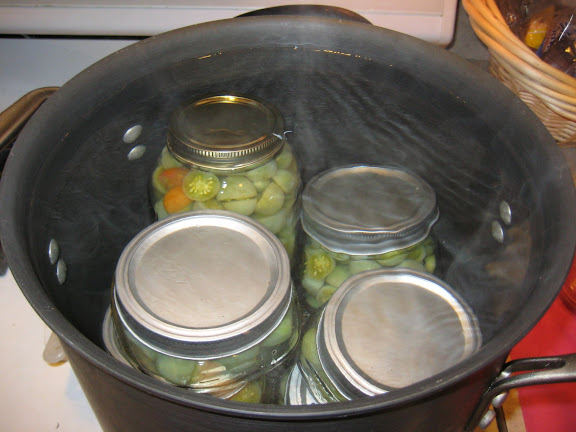
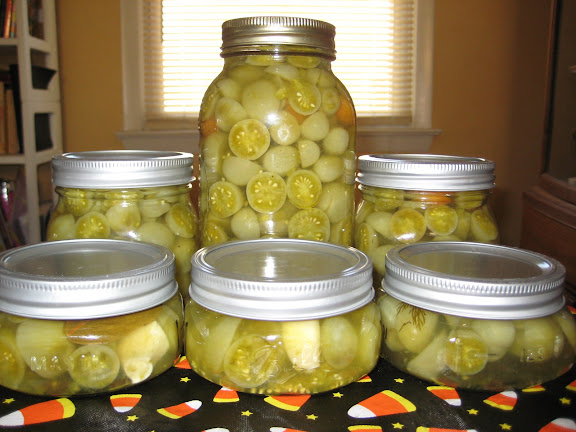
Next we took care of the green grape tomatoes. Well, hubz actually did this one while I tried to work on my paper. As described in the last post about this, we used the dilled green tomato recipe from the blue book. The biggest problem I anticipate here is that my partner, bless his little heart, didn't realize a head of fresh dill equals more than a single sprig. When he was already done I looked in the refrigerator and noticed half the bunch of fresh dill we bought was still there. If it had been me I would have just split the whole bunch up between each jar, but what are you going to do. I guess they'll just be more tart than dill. Hopefully they'll be edible! Here are pics of them boiling and the finished product.


Last but not least we tackled farmgirl's green tomato relish. Once again hubz mostly took care of it, but this time I hovered a bit to help when he needed it. It was a lot of chopping, that's for sure! But in the end we used up everything but a few cayennes and habaneros, so it was totally worth it. We didn't want to use quart jars, because it would be hard to eat all of that just between two of us in a week or two once it was opened. So we had to use half pint jars because that is all they had left in the store. I think this will probably work out better since the "relish" really came out like a thick, intensely flavorful sauce.

There was so much of it, we couldn't fit it all in one boiling water bath so put the leftover in a quart jar and ate that for dinner on a Mexican pizza. Thank goodness, after all that work, it really was super delicious! Somehow a couple slightly pink tomatoes got leftover, and a half-ripe orange bell pepper. So I also chopped those and cooked them with a box of Spanish Rice a Roni instead of a can of tomatoes, which again I am happy to report tasted extremely yummy . We had that on top of toasted hard corn tortillas, with black beans, corn, black olives, the relish and fresh cilantro. The thickness of the relish was slightly applesauce-y, and with just the right amount of sweetness from the apples too. I really enjoyed the texture since usually store-bought green tomato salsas are too watery. But it still had that great green tartness. MMM it was good. Those 3 MMMs are for the three pizzas I ate!

Friday, October 3, 2008

Fried Green Tomatoes & Salsa

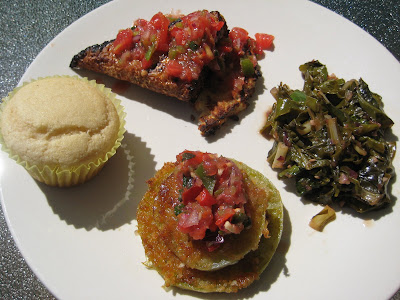
This is a closeup of fried green tomatoes with fresh salsa on top. All the tomatoes, green pepper, and jalapenos came from the garden. This was the first time I'd ever had fried green tomatoes and wow were they delicious! They were a bit tart but not too much, plus crispy on the outside and soft inside. Just right. I really liked how the citrus in the salsa topping helped to lighten the greasy fried-ness of it. Now that it is fall and we've got lots of green tomatoes on the vine that probably won't turn ripe before the first frost, I'll definitely be making these again.

I used this recipe for the fried green tomatoes from Pamela Cooks! blog. Thanks Pamela.
Here is my own salsa "recipe" though I just make it to taste so I'm just guessing on the measurements:

  • 2 cups chopped tomatoes (it is much better if you have the time to do it by hand, not the food processor)

  • 1/3 - 1/2 cup finely chopped red or white onion, or scallions

  • 1/4 - 1/2 cup chopped italian green frying peppers (or bell)

  • 1 jalapeno, seeds removed and minced

  • 1 or 2 cloves of minced garlic

  • handful of roughly chopped cilantro

  • Juice of 1 lime

  • teaspoon of cider vinegar

  • salt and pepper to taste

Mix all ingredients together and enjoy.

I ate them sitting outside next to the garden as part of a wonderful brunch on a gorgegous sunny Sunday. Pictured clockwise from the top: Grilled Smoky Tempeh (from Veganomicon) on a potato pancake topped with more salsa, swiss chard also grown in the garden sauteed with leftover smoky marinade, red onions and garlic, the green tomatoes, and a homemade white corn muffin. YUM!
Thursday, August 14, 2008

Summer Veggie Stew

Here is another dish to use up all those zucchini!
This is kind of a stew I made, with no real recipe, just threw in what I had to use up from the garden: zucchini, italian green frying peppers, herbs and grape tomatoes. Plus a half a bag of leftover arugula and a half a jar of tomato sauce, some chickpeas, red wine, onions & garlic and it was an easy dinner winner!


Directions:

First I sauteed the zukes, peppers & onion in olive oil with garlic and red pepper flakes. Added a couple fresh oregano and thyme leaves at that point, but saved most until the end.

After those veggies were just about tender and golden (about 10 minutes), I added the fresh tomatoes and sauteed those for a few minutes (2-3). (I'll also put broccoli or green beans in at this point, but didn't have them today) Then the chickpeas, tomato sauce and red wine went in, plus a little water, and simmered it all on low for a while (another 10 minutes or so).

Finally I added the arugula in the last couple minutes of simmering so it got just lightly wilted. Garnished with lots of fresh basil, oregano and thyme, then served it on whole wheat rigatoni.

Creative Commons License
Grow Peace Dance is licensed under a Creative Commons Attribution-NonCommercial-ShareAlike 3.0 Unported License.
Based on a work at grow-peace.blogspot.com.