Showing posts with label cucumber. Show all posts

Tuesday, April 5, 2011

2010 Retrospective: Diva Cucumbers

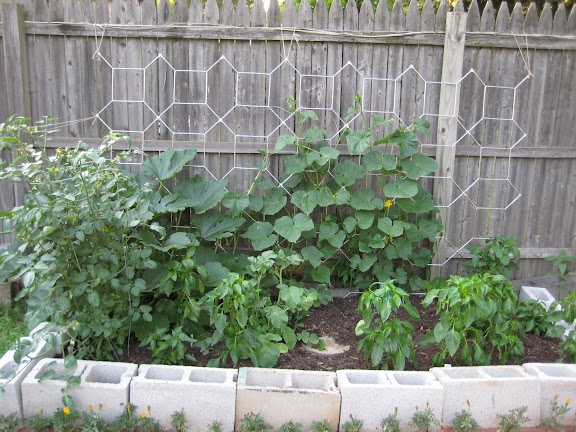
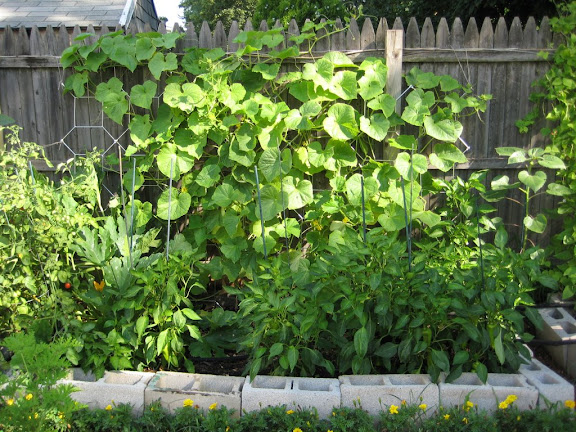
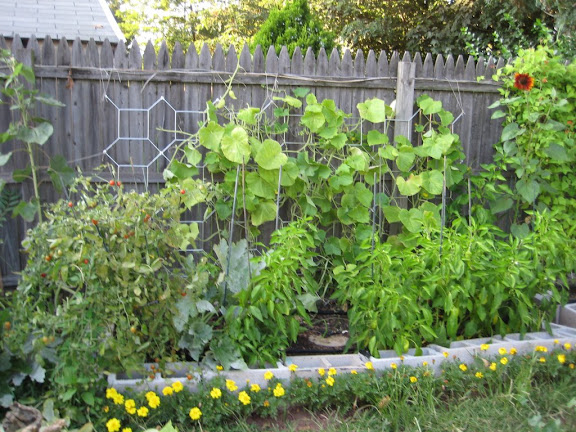
You might remember the crazy rowcover structure I stuck to the fence with velcro, described back in this post. It resulted in decent protection. Above you can how the diva cucumber plants looked as of August 4, 2010. That's pretty good considering my cucumbers were a yellow spotted, shriveling up, powdery mildewed mess by Aug. 9th in 2009. There were just two major problems: 1) the Agribon didn't stick to the velcro very well, so even after I tried stapling it, it was tough to peel the cover off for harvest without ripping the velcro from the fabric and 2) I think some especially intrepid cucumber beetles were able to get to the plants through cracks in the fence. Still, it was good enough protection that the plants stayed healthy for a longer time. I was a bit disappointed with the Diva's production though - I probably picked less than 10 cucumbers, even with 4 plants. This year I'm going to try sewing the velcro to the Agribon with a wide zig zag stich, and plant Cool Breeze cucumbers. We'll see if they're any better.


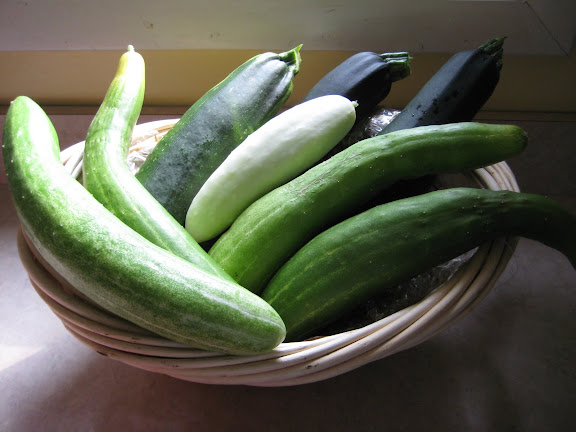
Here is one of the cucumbers I harvested, along with some other garden veggies & berries picked that day. When they did grow, they were great! Really smooth and not bitter at all.


I made it into one of my favorite summer dishes - cold peanut soba noodles. I also shredded the carrots and turnips from the garden in it too. Turnips are suprisingly sweet when shredded raw!

Saturday, June 19, 2010

Insect Control Structures

So I'm trying out new ways to control insect problems this year. Above, you see a low tunnel (at least I think that's what it would be called) that is covering two cavili squash plants, to protect them from Squash Vine Borers. I built it just like I did the others described in this post. In fact, I used the wires from the winter rowcovers and just moved them over. The only difference is this time instead of tying the cover on with rope, I just clipped it on with clothespins and used rocks to hold down the bottoms. I also used the lightest grade of Agribon so they won't get too hot under there.

So far, they seem to be working very well. It was these plants I grew from seed, and now they're very big with 3 squash growing on them. They are supposed to be self-pollinating, so I won't have to take the covers off, or try to hand pollinate them. The fruits have been there for about a week now, and are still only about 3 inches long though, so I'm a bit worried they're not getting pollinated for some reason. I guess we'll see how it goes this week.

The other rowcover experiment I'm trying this year is kind of a crazy contraption.
Underneath this Abgribon are 5 Diva Cucumber plants, that need protection from cucumber beetles. I've already seen lots of them around the yard, so they are definitely a big problem. All my cukes were decimated by them the past two summers, so I knew I had to try something because I love cucumbers! The Diva cukes I grew from seed are also self-pollinating, so hopefully this will do the trick.

The problem is they grow up a trellis, so I had to get creative. What I did was use extra-srength outdoor velcro to attach the rowcover to the fence. Unfortunately, I guess because the fence was old and dirty, it didn't stick very well and is starting to peel off. I'm going outside now for my second attempt - this time I'm going to staple the velcro to the fence.

Otherwise, they seem to be growing pretty well under there. I haven't been able to look at them in over a week since I didn't want to completely pull the velcro off until I had time to staple it, so I'm excited to go out there now and take a peek! Hopefully I'll see some flowers...

Sunday, May 16, 2010

Seedlings I Planted Myself

Although I bought most of my plants this year, and direct seeded the rest outside, there were a couple that I started inside and grew under lights.

These are most of them - Diva cucumbers & Cavili squash. The Diva seed packet went into great detail about planting them inside, so I didn't plant them outside like I usually do with cukes. I asked on Gardenweb if that was necessary- and another Diva grower said it wasn't, but would give better germination. Since we were having a cold snap, I figured I might as well do them inside.

Well, he wasn't kidding about germination! I got 100% by just 3 days after planting. I swear, one morning I left work work and nothing was there, then I came home and Bam! they looked like this! I couldn't believe it.
Now here they are 10 days later. I hardened them off for about a week, and planted them after I took this picture.

And here's the Cavili squash on the same day, with the other seeds I planted - Lemon Gem Marigolds - in the back:
The marigolds were a bit of a disaster this year. Well, ok - let's call it a "learning experience". First of all, you can see that four of the cells are empty - those didn't even germinate. That may be because I used the same pack of seeds I bought in spring 09. Also, I planted them sometime in Mid-April but the ones that did grow are still tiny. Maybe that's normal but I'm not sure.

Then, at the same time I planted seeds I saved myself from the red and tangerine gem marigolds I bought from Well Sweep herb farm last year. Not one of those germinated. Once again, I turned to the awesome Gardenweb forums for advice, and discovered that you should save seeds from the plants at different times during the growing season. This is because if there are no pollinators around, or the weather is too hot or too cold, you may not get viable seeds from the blooms. I saved all of mine from the plants at the end of the season, so it was probably too late for pollinators and too cold. I also learned that the different colors will cross-pollinate, so it is unclear what colors I'll get from the seeds I save. One of them might be dominant, or I could get all sorts of combinations.

After finding that out I went ahead and soaked ALL of the seeds I saved last year overnight, and tried to presprout them on moist paper towels. Out of hundreds of seeds, maybe 10 of them sprouted. Unfortunately, as 1 more thing in a comedy of errors, I left them in the paper towels longer than I should have. I still tried planting them even though they had 2 leaves and a long tail, and out of the 5 or 6 I planted, 1 is now still alive.

So I finally gave up and bought a pack of tangerine gems from Seed Savers, since I have room for around 20 plants. They are germinating now. It is a little late to start them, but they'll probably still be blooming by July or so, and will keep flowering into October, so not too big of a deal. At least now I know a little more and hopefully this year I'll do a better job at saving the seeds.

Saturday, July 18, 2009

Mother Lode of Cucumber Recipes

I picked 3 more cucumbers this morning, which makes about 15 waiting to be eaten in my crisper drawer. Luckily, I just found this great resource:
http://www.lpl.arizona.edu/~bcohen/cucumbers/recipes/
I've never imagined so many things you could do with cucumbers! Everything from cucumber limeade to sandwiches to soups and even hot dinners! The recipes aren't tested or anything (and many not vegan) but there sure are a LOT of them and it has given me some great ideas.

Plus, it says the world's record for largest cucumber is 59 lbs. WHAT?!?! 59 lbs! Wow.

I'm really liking the limeade idea. Not sure what I'm going to make yet though. Will update this post with a pic when I figure it out!

While I'm at it, here's a nice collection of borage recipes too:
http://www.herb.co.za/herbal/borage-recipes.htm

Wednesday, July 15, 2009

Midsummer Meal

This was last nights dinner. A little random, but it used up everything I picked from the garden. On the left was a quinoa, turnip green, smoked tempeh & almond dish. It was garnished with lightly sauteed red and yellow grape tomatoes on top. (we've gotten about 10 so far - I can't wait till the tomatoes really get going over the next couple weeks!!) The turnips were diced and sauteed in garlic, smoke flavor, onion & red pepper flakes. It was delicious! The almond added just the right amount of crunch. I got the idea here: Novel Eats Simply Vegan blog Thanks Samantha.

In the middle are dill pickles made from 10 pickling cucumbers & a packet of Ball dill mix. Also added some kung pao peppers from the garden and a bit of garlic. I didn't do a water bath with them - just refrigerated in two jars. I don't think we'll have any problem eating them within two weeks. I already ate almost half a jar myself yesterday! Above you see the cucumbers (I didn't use the three on the right - those were left on the vine too long) and below is the final product. I picked 6 more today.

Finally on the right are more mashed turnips and potatoes. I really can't get enough of those. On top is a beautiful edible Amazon Jewel climbing nasturtium - it was really delicious! Floral yet spicy. I'm looking forward to more of these gorgeous blooms. Here's a collage of the various colors. I took all of these pics last night. The hardest part is picking them to eat - I just want to keep looking at them.

Saturday, October 25, 2008

The Cucumbers' Journey to Refrigerator Pickles

This is an old picture from July when the cucumbers were at their peak. Back then it was summer so I was outside all the time, and not on the computer. Unlike now that it gets dark so early I can't get off this thing. Boo I hate winter.

Anyhow, it was pretty exciting at the time. My first attempt at any sort of home preserving! These were just refrigerator pickles, that did not involve any actual processing, so they only lasted a couple weeks. But they sure were absolutely delicious!

On the left are the white cucmbers I got for free from Park Seed. On the right were long thin green cucumbers. I'm not sure what type exactly, but they were a nice healthy plug plant from the nursery.

Here is the recipe I used, from Stellamarie over at the ppk:
This is my friend's mom's easy and yummy recipe for some damn fine 24 hour pickles. It works with carrots, green beans, cucumbers (unwaxed), cauliflower, etc etc:
Boil together:
6 cups water

1 cup plus an extra splash or two vinegar (white vinegar)
1/4 cup kosher salt

1/2 cup sugar (it doesn't make sweet pickles this is just to mellow it out. if you want sweet pickles you need more sugar)


Boil til dissolved and cool fully (you don't want to cook the veggies when you pour this on them later) Meanwhile, peel a whole bunch of garlic cloves (6 or 8 per jar) and have your veggies washed and cut into pickle size. Also, plan on about 2 herb boxes (the boxes from the store) of dill for every three regular canning jars. Smash the garlic cloves a little bit with the flat side of your chef knife if you really like garlic. When the vinegar mixture is totally cooled off, put a few garlic cloves, small handful of dill and handful of veggies in the jar. Then more garlic, more dill, more veggies, making layers. Repeat layers depending on how big your jar is. Pour vinegar mixture on top to fill, then put in frig for 24 hours. Eat delicious pickles. You can re-use the brine 2 more times, just put more veggies in.

I used just regular course sea salt because it was all I had, plus a combo of fresh & dried dill + dill seeds, garlic, jalapeno, & peppercorns. I also added red onion sliced thin.

I made one other quart jar in addition to the two in the picture and gave it to my Dad. I think he was an unbeliever at first, but ended up loving them! He has mentioned how good they were several times since then.

Unfortunately I didn't realize that cucumbers will only produce for so long, and you should do successive planting if you want them to last all season. Mine died out at the end of August. Here are a succession of garden shots so we can see their progress over the season:

June 23rd: Getting There!
July 25th: Awesome!
July 27th: Yummy!August 16th: On their last yellowing legs.Sept 3rd: totally dried up. :-(
Creative Commons License
Grow Peace Dance is licensed under a Creative Commons Attribution-NonCommercial-ShareAlike 3.0 Unported License.
Based on a work at grow-peace.blogspot.com.