Showing posts with label garden shot. Show all posts

Monday, June 4, 2012

Tah dah! Summer garden is in!

I finally got around to planting my garden yesterday. Even though I hope to sell the house over the next few months, I figured I should at least make the garden look nice. I'm going to try to sell without removing it, hopefully someone will like it.

The garden was a pretty big mess, since last fall I was too busy with my 11 month old son to do any cleaning up, and unfortunately my husband has a brown thumb. So as you can see below, the before pic is pretty ugly! But I'm happy with the after pic, even though I have a few more finishing touches to complete (like fixing the fence). You can't see much b/c they're still all seedlings or seeds, but you get the idea. The entire list of what I planted is on the 2012 garden plan tab.

 Before
After

Now the other side of the yard was an even bigger mess. I'm embarrassed to show this before pic, but I guess at least I had a decent excuse. The good news is a month or so ago I removed everything and replaced it with grass seed. That side of the yard was just too hard to maintain, the paths grew so many weeds and it never really got enough sun. So even if I wasn't selling the home, I'd decided last year to remove it. I didn't really believe one little bag of grass seed would fix it, but lo and behold it came out great! I can't get over how you can't even tell there was a garden there 2 months ago.

I guess that is a testament to the benefits of concrete block gardening. One of the reasons I originally chose them was so I could move them if needed (low cost being the other reason). I was really happy to find out that they truly were easy to take apart.

  Before - beds 1 and 2.
After!


Monday, August 31, 2009

Rainy Saturday in the Garden

Here's a panorama of the garden from just this past Saturday. Not as big as I hoped things would grow, but considering the terrible weather we had this year I'm pretty happy.

Left side of the yard that we built last spring (2008).

Right side that was all added this spring (2009).

Monday, May 25, 2009

Everything's In!

Wow, I planted my heart out yesterday. I was planting from 10AM until 7PM. But finally, everything I have is in the ground. Yep, the whole big list!

I am soooo excited for it all to grow. I planted something in every possible inch of the backyard. If everything grows, I'm going to have veggies and flowers out my ears!

Yesterday I also noticed the snap peas finally grew the first pod. Then this morning I looked again, and now there are 7 or 8! One is even a couple inches long, looks like it will be ready to eat in a few days. I swear that wasn't there yesterday. It was like they grew the pea pods overnight!

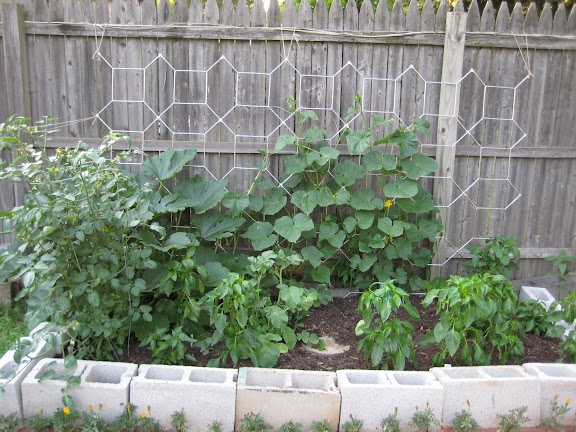
More great news: I found the camera battery and took lots of pictures. In fact, I took so many I don't even know where to begin posting! Of course, it doesn't look like much yet either, since lots still has to grow. But I'll try anyway. Here's a couple long shots of each side of the yard.

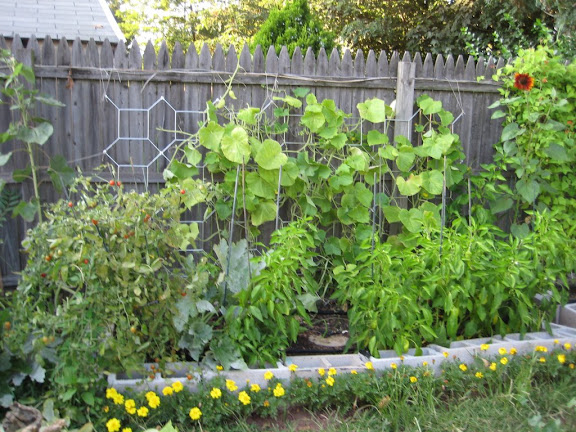
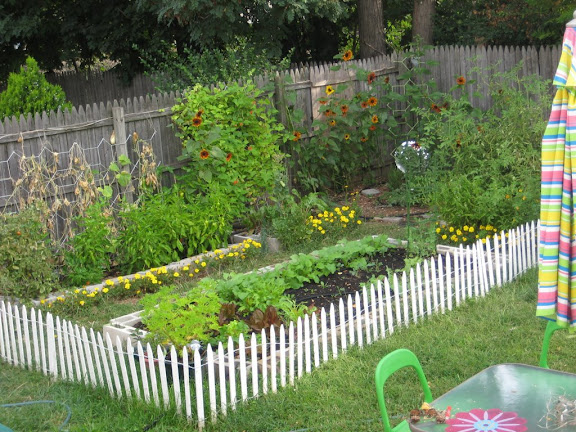
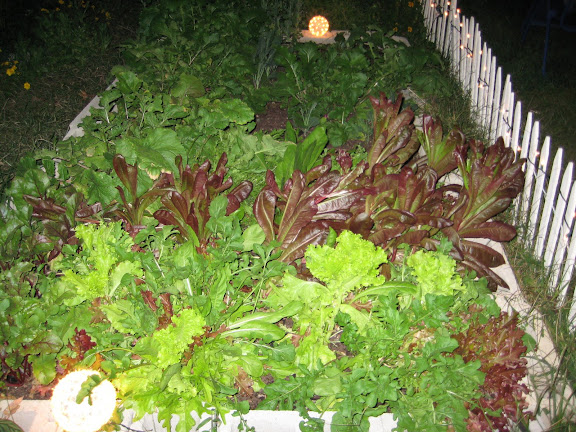
Above, you see the left side. There are 5 beds: along the big fence on the left, in the front is the peas & salad, in the back is peppers and the future home of climbing zuchinni that hasn't sprouted yet. Behind that is the herb garden. Then, on the right near the white picket fence, in the front is the large bed with basil, peppers, tomatoes, and some of the remaining radishes & arugula.

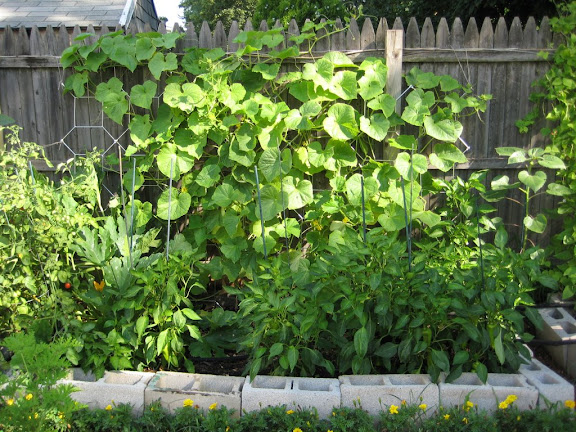
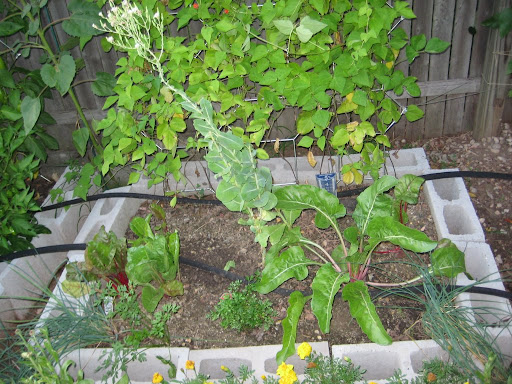
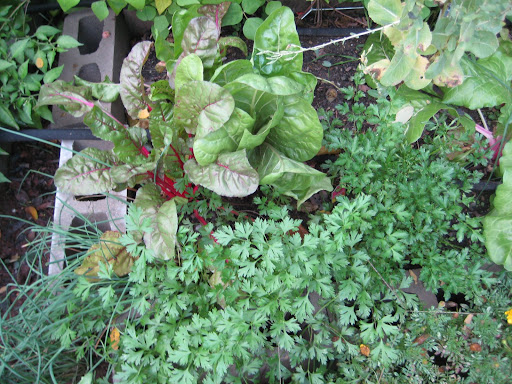
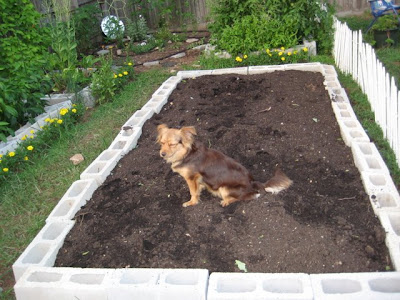
Then below you see two shots of the two new beds on the other side of the backyard. On the left, mustard greens, more peppers & squash, plus emerite pole beans that haven't sprouted yet. On the right, carrots, beets & turnips. Of course, more close up shots will follow soon enough. (you may also want to scroll back a bit through the last couple posts, as I updated them with cute pictures of lambs and chickens!)


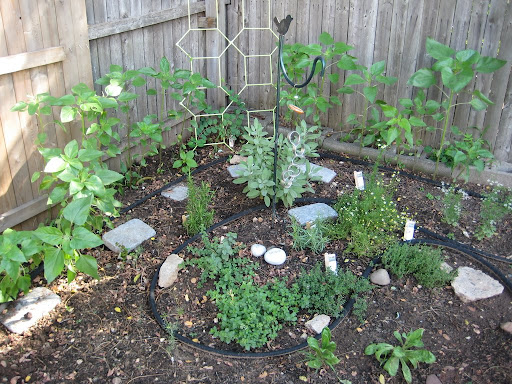
I also have a decent picture of another new, somewhat strangely placed bed. Like I said, I planted every possible inch of the backyard! haha

Below you can see the fern & mint garden in a little corner between the house and the fence. I think this may end up being my favorite. I don't know why, I just love ferns so much. I wasn't sure if I should buy the white yarrow (that's the plant in the front on the left) but I'm so glad I did - I think it is going to look awesome next to the Ostrich Fern in the back left corner. I can't wait to eat the fiddleheads next spring!! In the middle of the yarrow and the fern you can only barely see the purple perilla (shiso, Japanese mint) in the shade. On the right, in the back is white peppermint, and the front is pineapple mint.

I am also putting a couple paths in there with stepping stones, just haven't gotten to that point yet in this picture. I already dubbed the concrete block in front of the yarrow my "contemplation seat". Makeshift for sure, but still, so peaceful. I sat and contemplated the ancient, even prehistoric nature of this garden for a good long time when I was done. Eventually, I plan to get a real stool in there for this purpose. Maybe I'll even dry the yarrow stalks to read the symbolism of random events using the I-Ching . Now that would be cool. haha

Saturday, October 25, 2008

The Cucumbers' Journey to Refrigerator Pickles

This is an old picture from July when the cucumbers were at their peak. Back then it was summer so I was outside all the time, and not on the computer. Unlike now that it gets dark so early I can't get off this thing. Boo I hate winter.

Anyhow, it was pretty exciting at the time. My first attempt at any sort of home preserving! These were just refrigerator pickles, that did not involve any actual processing, so they only lasted a couple weeks. But they sure were absolutely delicious!

On the left are the white cucmbers I got for free from Park Seed. On the right were long thin green cucumbers. I'm not sure what type exactly, but they were a nice healthy plug plant from the nursery.

Here is the recipe I used, from Stellamarie over at the ppk:
This is my friend's mom's easy and yummy recipe for some damn fine 24 hour pickles. It works with carrots, green beans, cucumbers (unwaxed), cauliflower, etc etc:
Boil together:
6 cups water

1 cup plus an extra splash or two vinegar (white vinegar)
1/4 cup kosher salt

1/2 cup sugar (it doesn't make sweet pickles this is just to mellow it out. if you want sweet pickles you need more sugar)


Boil til dissolved and cool fully (you don't want to cook the veggies when you pour this on them later) Meanwhile, peel a whole bunch of garlic cloves (6 or 8 per jar) and have your veggies washed and cut into pickle size. Also, plan on about 2 herb boxes (the boxes from the store) of dill for every three regular canning jars. Smash the garlic cloves a little bit with the flat side of your chef knife if you really like garlic. When the vinegar mixture is totally cooled off, put a few garlic cloves, small handful of dill and handful of veggies in the jar. Then more garlic, more dill, more veggies, making layers. Repeat layers depending on how big your jar is. Pour vinegar mixture on top to fill, then put in frig for 24 hours. Eat delicious pickles. You can re-use the brine 2 more times, just put more veggies in.

I used just regular course sea salt because it was all I had, plus a combo of fresh & dried dill + dill seeds, garlic, jalapeno, & peppercorns. I also added red onion sliced thin.

I made one other quart jar in addition to the two in the picture and gave it to my Dad. I think he was an unbeliever at first, but ended up loving them! He has mentioned how good they were several times since then.

Unfortunately I didn't realize that cucumbers will only produce for so long, and you should do successive planting if you want them to last all season. Mine died out at the end of August. Here are a succession of garden shots so we can see their progress over the season:

June 23rd: Getting There!
July 25th: Awesome!
July 27th: Yummy!August 16th: On their last yellowing legs.Sept 3rd: totally dried up. :-(

Monday, October 13, 2008

First Raised Bed Results

This is a picture from August 16th of the first raised bed we built back in April. You may remember it was planted with cool weather chives and lettuce that eventually got attacked by rabbits. In the middle you can still see one of the romaines that were attacked, fully having gone to seed. I left it on purpose just to see if I could get it to reseed itself. The chives also appear in each front corner, nice and tasty. I used them in my cooking quite a bit. The hardest part, in fact, is remembering to cut them since they make a yummy addition to so many dishes! Next year I think I'm going to have to move them into the herb garden though.

After the initial chives and lettuce, I direct sowed some Bright Lights heirloom Swiss Chard and Parsley seed in June and then planted another nursery parsley in July. The flat-leaf parsley on the left, immediately next to the chives, is the one I direct sowed. I'm really impressed with how nicely the parsley came in, considering that from what I have read parsley is normally difficult to germinate. It did indeed take a really long time to grow, but eventually filled in well. Since they are supposed to be biennial, next year they'll probably have to be moved to the herb garden too. I planted both the parsley and chives before I planted the herb garden so that's why they got misplaced.

As for the chard, I thought it grew extremely slowly too. But unlike parsley, that seems to be irregular for chard. You can see the one on the right is much bigger than the two right next to each other on the left. I really don't know why that is, I planted them all at the same time. I read on the gardenweb.com forums that others experienced a slow growing season this year, so that may be why.

In the background is heirloom Scarlet Runner Beans but I'll describe them in more detail another day.

And here is that same bed on Sept. 28th. I haven't seen any baby romaine there so I guess it didn't manage to reseed. I already trimmed the chard once or twice and had a few delicious side dishes from them. I like to just saute them with a little olive oil and minced garlic, then sprinkle with lemon. Yum. Swiss Chard is definitely my favorite green.

I intended to make tabouleh with the parsley this past weekend but didn't get around to it. Luckily parsley freezes well so whatever I don't manage to cook before the hard frost, I can just stick in the freezer for later.

Monday, October 6, 2008

Fall Lettuce At Night

This is a recent shot of the fall lettuce, from October 2nd. It is illuminated by christmas lights at night. You can see assorted mesclun, red romaine, and spicy mesclun (plus turnips and beets towards the back). Despite the cabbage worms, we still got quite a nice crop.

I'm going to have a garden party this weekend to use everything up before frost. This is the planned menu at this point, though I may adjust it over the next few days:

Menu:
Blood Punch
Pimiento Olive Cheeze & Crackers
Hummus, Babaganoush, & *Tabouleh w/ Pita
Morocan Olives and Oranges w/ Grilled Crostini
Lentils and Lemon w/ more Crostini
Autumn Vegetable Soup (with butternut and/or pumpkin, *turnip & *swiss chard greens)
*Salad w/ *Grilled Beets/Turnips and Moroccan Orange Dressing
Grilled Garlic and Lemon Green Beans + *Peas
Grilled Moroccan Spiced *Carrots
Apple Tart

*all starred items grown in my garden!

Wednesday, July 30, 2008

New Raised Bed for Fall

This is my new raised bed, just finished on July 28th in time for a fall crop. What a lot of backbreaking work that was! First my husband and I had to dig up all of the weeds, then turn the soil over. We placed the concrete blocks and dumped in at least a ton of soil that was delivered in a pile on our driveway, so we had to hand shovel the whole pile into the bed. We slept well that night, you betcha!
Not a very exciting post I guess, but it was an excuse to use a picture of my new doggie. :.) I can't help myself, just look at that face!

Saturday, July 26, 2008

Herb Garden

This is the herb garden on July 25th. As you can see, I planted it in the ground, not in a raised bed. I figured it was okay to put them right in the ground since the only other garden I really ever had in my adult life was in this same neighborhood, about 1 mile from here, and the herbs I planted grew awesome in the ground.

So here we have baby heirloom sunflowers along the back fence, with a red trumpet native, non-invasive honeysuckle growing up the center trellis. Unfortunately the honeysuckle doesn't seem to be doing too well. I would have thought since it was native it would have grown like crazy, but it seems to be hardly growing at all. Maybe it isn't getting enough light due to the shadow of the fence. I think I may try to move it to a sunnier area.

Then, if we move clockwise in a spiral from the bottom right (I did try to plant this herb garden in a spiral, not sure if you really can tell) there are two little heirloom calendula plants, a wispy dill that really didn't do well at all so you can barely see it, oregano, spicy oregano, rosemary, sage, more wispy cilantro that barely grew, roman chamomile, thyme, lemon thyme, and tarragon. Everything was a plant from the nursery except for the calendula, dill and cilantro which were all seedsaver heirlooms that I direct sowed.

Friday, July 25, 2008

Late July Garden & Zucchini Recipes

Well, I was going to take my new dog kayaking today, but the weather didn't cooperate. So now I'm stuck inside while it rains, and have a minute to do a quick blog post. Here is a recent pic of the garden. I'll show some more detailed pictures soon, but suffice it to say the grape tomatoes, zucchini, cucumbers, peppers and herbs are doing fantastic!

There was a little problem with blossom end rot on the peppers that has finally gotten under control. But just look at this bounty, not bad for my first real garden!Now here is my favorite salad treat to make with all of this:
Zucchini with Lemon and Mint
*1 medium zucchini
*juice from 1/2 lemon
*1-2 tsp olive oil
*5-10 mint leaves
*salt & pepper
*nasturium blossom for garnish (optional)

Slice zucchini very thin (a vegetable peeler or mandoline helps). Chiffonade mint (pile all the leaves on top of one another, then roll them up. Slice into thin strips). Mix zucchini slices with lemon juice, olive oil, mint, salt and pepper, then serve. Note: amounts are approximate. Use less lemon or mint to taste.

And look this zucchini is bigger than my dog!
It tasted really good! I made marinated grilled zucchini sticks with it. I swear they were better than french fries (and that's saying a lot).
Grilled Marinated Zucchini Sticks
*1 extra large zucchini (or 2 medium, or 4 small)
*1 large garlic clove, minced and
mashed to a paste with 1/2 tsp salt
*2 tbls fresh lemon juice
*1 tsp white wine vinegar
*1/8 cup olive oil
*1 tsp fresh thyme (more to taste)
*1 tsp red pepper flakes
*salt & crushed black pepper

Cut zucchini in half long-ways, then in half again so you have four pieces. Cut off the seeds (longways, like slicing off a triangle of seeds). Slice again longways, and then crosswise in about 3-4" length, so that they are steak fries like sizes, as in picture above. Place in a dish large enough to put them flat in one layer. Add all other ingredients and mix well with hands or tongs. Marinate for at least 3 hours or overnight. Carefully lay across grill, and cook on low, for about 5 min. on each side. Finished stick should be crispy on the outside, tender on the inside, and look something like this:

Sunday, May 18, 2008

The First Raised Bed


So I don't have a car yet, having just moved out of the city to the suburbs. But when I first moved in, my husband and I rented a car. Since we had the car, we tried to get as much house related stuff as we could, knowing we wouldn't have one again for a few months. In my excitement, I bought a couple cold weather plants, (this was in March) even though we did not yet have the bed set up. I got some mesclun greens, romaine lettuce, chives and a strawberry.

I decided to use cinder blocks as the most cost effective means to build raised beds. I figured the cinder blocks would also be good if I only used one layer, they could be moved next season if necessary. Being a beginning gardener, I knew this season would probably hold some lessons for me so I didn't want to do anything terribly permanent. We also picked up 10 40 lb bags of soil.

Two weeks later the plants were looking pretty unhappy in their containers, but I still hadn't any time to set up the bed. So after work on a Thursday hubby and I frantically dug up the weeds, arranged some of the cinder blocks and filled it with soil. I couldn't believe it took 8 full bags of soil just to fill this one tiny bed!!!! We realized at this point, we were going to need a better solution for getting soil then loading a million bags into a rental car.

To the right is a picture of the first finished raised bed. That's two mesclun in the front, with a chive in the corner on either side. Then 4 romaine in the middle and another 2 mesclun in the back.


I also put the strawberry in a self-watering pot that I was lucky to score on sale for $5.99. Here it is.

Before Shots

Here is a shot of the backyard when we first looked at the house in January 2008:


Its not very big. There is a little more to it than this, but unfortunately we didn't get any other good shots besides this one. Though it really does show most of it, so obnviously this will be a blog about gardening in a relatively small, semi-urban space. (yes, that is a train track in the background)

Here is one of the front right after we bought the house in the first week of April. It is already pretty cute but as you'll see later there is a little spot of grass below the tree that I am attempting to plant with a silver-blue theme xeriscape:
Creative Commons License
Grow Peace Dance is licensed under a Creative Commons Attribution-NonCommercial-ShareAlike 3.0 Unported License.
Based on a work at grow-peace.blogspot.com.